Heya Nesters! I have an exciting reveal for you guys today. I've been waiting with bated breath to grab the final reveal shots of this oldie but goodies. Check out the before posts right here and here. So without further ado, lets take a look at the journey.
It sure was a humble beginning. The piece is nice, however, I had visions of its potential grandeur.
I love to have a little glitz in my life and a pop of color is always necessary, so why not combine the 2 in one splendiforous nightstand.
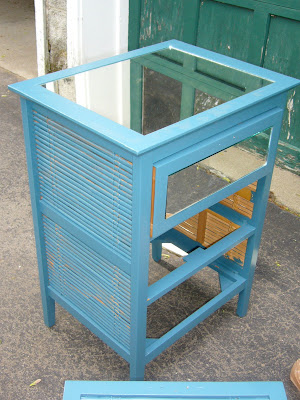
I took off the handles, the top drawer stopper and removed the drawers. And then I was good to go and paint! Paint like the wind!
I found that the bamboo sides were still shadowing the original color so I went whole-hog and painted the inside too. I admittedly did a terribly job on the inside, figuring no one would be able to see this portion. {And yet... here I am, putting it on the internet! Woops! Don't tell, ok??}
I ordered glass at the local mom'n'pop glass shop around the corner and had custom glass cut to fit in the panels of the top and drawer facades.
Scrapbooking paper is one of my favorite shopping sprees to go on. "Why?" You ask? It's cheap and it gives me ideas. I picked 3 different patterned papers. One for each drawer and Modge Podged them on. Layer one coat of MP, then the paper immediately, allow to dry. Then 2 thin coats of MP on top of the paper, allowing time to dry in between each coat. I finish it off with 1 coat of Polycrylic
 to really seal it off.
And finally, I added the new hardware. In hindsight, I should have added these before adding the mirrored front to each drawer. It worked out just fine in the end, however, it probably could have ended in shattered glass and a serious wound, since I was using a power drill to make new holes. Y.I.K.E.S.
But here is how she turned out!
The lighting is a smidge dark but you get the idea!
I think it looks super cute in Lexie's room! It was a long time coming though. This was one of those projects where I became a little disenchanted after second-guessing my choice to maintain the painted bamboo sides. But after a self-inflicted kick in the rump, I saddled up and finished it. So now Lexie has a great looking night stand that elicits a chic, modern, feminity. And will actually be able to bounce light around her room to make it feel more bright, open and airy. Yay for dual purposes!
Alright Nesters, what do you think? Do you have any recent before and afters that you'd like to see on Temporary Nest? Or any tips on using mirrors, or modge podging? I want to hear your thoughts- so spill the beans!


Oh my gosh. I think I'm in love with that night stand. The mirrored fronts take it to the next level.
ReplyDeleteThank you! I'm so happy you like it Liz! :)
ReplyDeleteI love color and especially that paper! What a great idea to use scrapbooking paper.
ReplyDeleteWhat a great makeover! I especially like the mirrored top and the colour you used.
ReplyDeleteThanks for visiting my blog and leaving a comment :)
that turned out just beautifully!! what a great idea to add the mirrors!
ReplyDeleteThanks Cassie!! <3 I love mirrored furniture so I thought, why not make it myself?! :)
ReplyDeleteAwesome! I love how you took this piece straight to glam!!
ReplyDeleteCan you say.....suh-weeeet!
ReplyDeleteThat is fantastic! Great thinking!
ReplyDeleteWow! I really like the mirrors. I found you through Primitive & Proper's Piece of Work Wednesday and now I am your newest follower.
ReplyDeleteI can't believe it's the same piece! Too cute, I need to work up the guts to do something mirrored!
ReplyDeleteBest,
Ashleigh
I love it!!!!
ReplyDeleteI have the 3 drawer dresser...currently in my son's room and i'm getting a new dresser to replace it!!! and you just gave me a great excuse to redo this one!!!! It looks awesome!good job.
Im currently making a night stand and wanted to add mirrors. can you explain what you used to secure the mirrors? Glue over existing? Thank you so much.
ReplyDeleteThank you so much for poppin by ladies!! You are all too sweet!
ReplyDeleteKristy - to answer your question I used Gorilla Glue that you can pick up just at your local hardware store. I was weary because I had heard things about glue taking the silver backing off the mirror but in doing more research I found that gorilla glue was pretty much the best product on he market to keep anything adhered. So I just followed the instructions on the bottle. I used heavy books to hold the mirrors in place while drying. But careful that they aren't too
heavy or oh could crack the glass. And a day later... voila! Mirrored nightstand! Also if you're going to add hardware to the drawers like I did... its best to do that first THEN add the mirrors. That way you don't risk breaking the glass.
I hope that helped answer your question! And thanks for swinging by! I hope to see you all come back!<3