
Heya Nesters! Is it my imagination or are the weekends flying by even faster than ever before? I can't believe it's already Monday! Where does the time go!? AHHH! I'm in the final countdown to the NYC baby shower for the Bro and SIL, which means anticipatory crafting overdrive! But I still made time for my beloved upholstery class! And I was biz-eeeeeeee in class this week since it's crunch time and I want to fill you guys in on every bitty bit! So lets hurl ourselves into it, shall we?

This is how I was greeted by our lovely Satine.
{And also my much needed and lovely coffee...}
I unwrapped Satine and she was looking good! But I knew I had a full plate for the day, since it was the second to last class. {YIKES!} I needed to finished tightening the inside back, pleat the back, make and apply buttons, and get started on the side panels and outside back. Ambitious much? I vote yes.
Button-making was the first to be checked off the list. I was able to use fabric trimmings from the side of the seat to create my matching buttons. It's amazing what a simple machine the button maker is. After I cut a small circle of fabric that fit the same size as the button machine, I layered what will be the metal dome inside the machine, and pushed them in with this dowel.


And here is the super high tech button machine! Not really at all but boy does it make a kick-ass button. I apply the looped button backing into the bottom of the machine and then the above piece face down. Then pull the lever and voila! You have a button.
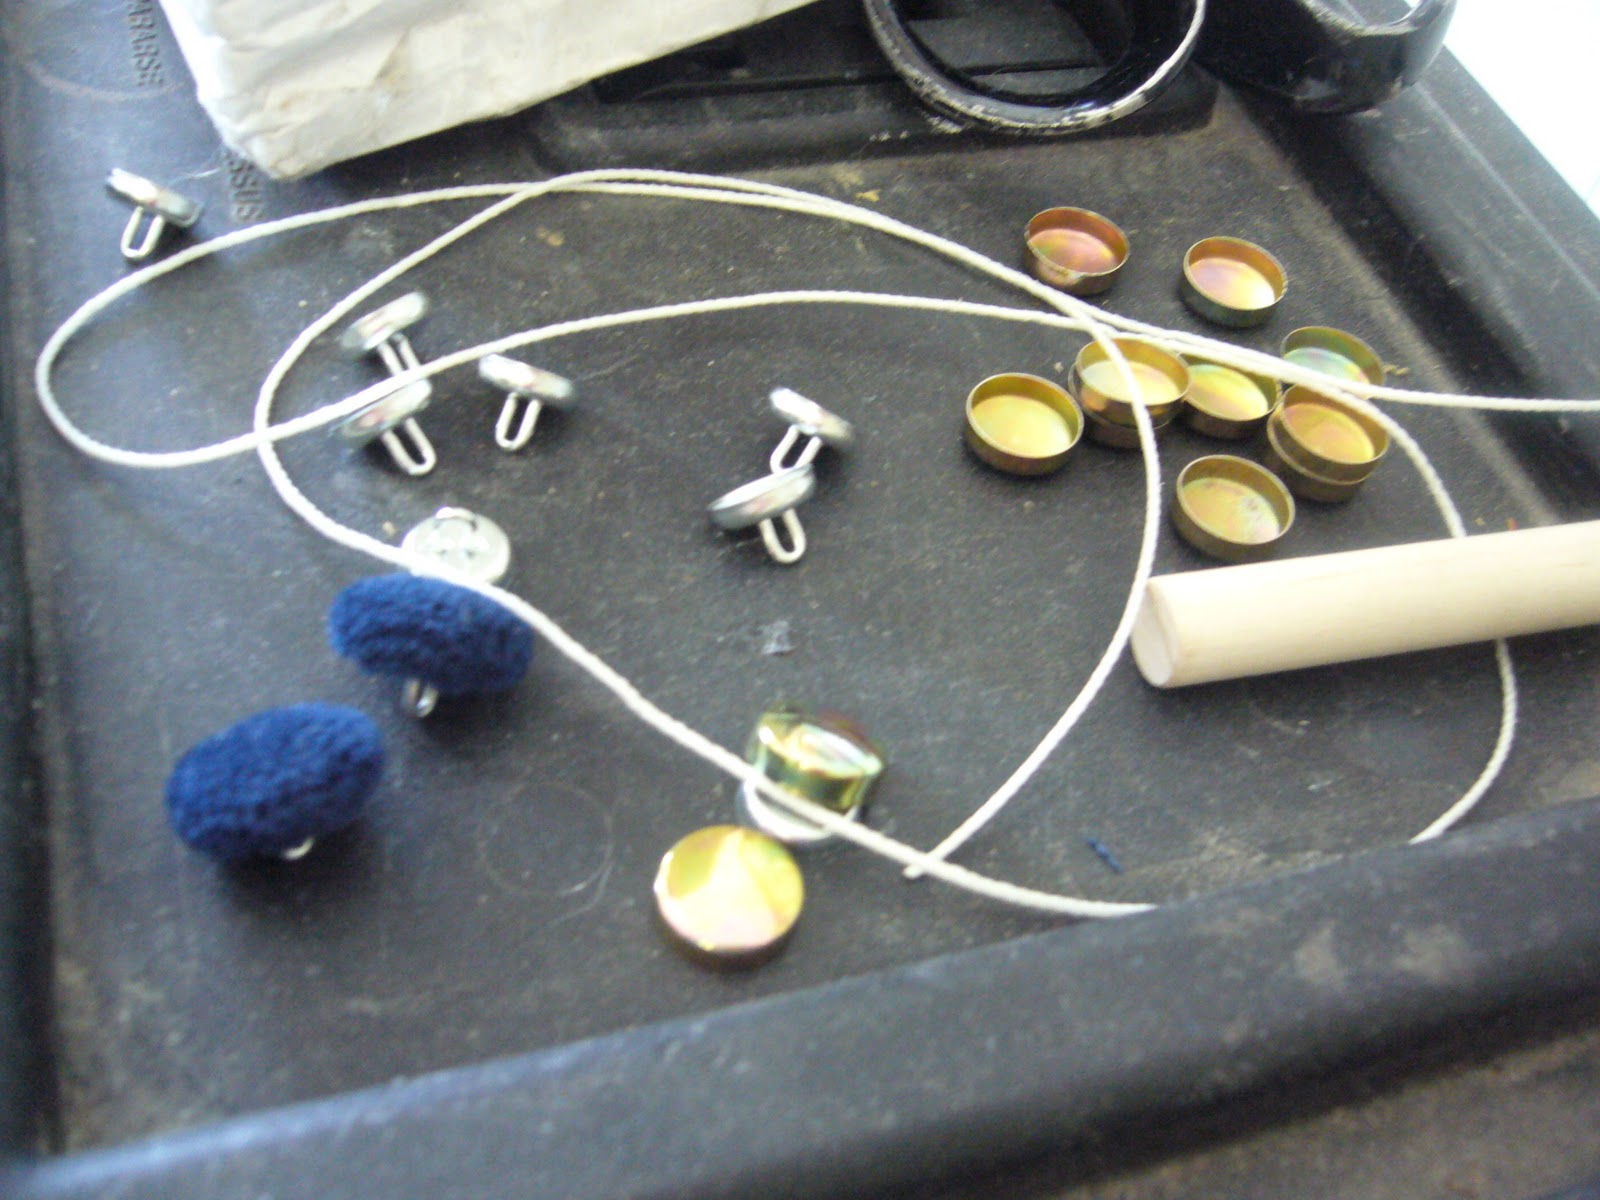
I got good after 10 tries. I only needed 8 but just in case, I made a couple extras. After each button is made, use twine to tread through the button, and yank on it to test that it is a strong button. I have heard horror stories of people tufting a sofa, finishing the whole shebang and all of a sudden... POP! A button pops, leaving only the loop backing. There is no turning back from there, you have to take the whole thing apart and start over again. No thank you! I'll do it right the first time!

I came back to Satine and worked on tightening the inside back. This was a toughie since she's got so many curves. But after strong arming it, and a little guidance from Kevin and Pamela, I successfully tightened her right up! It was so important to get it tight so that the pleats fall into place easily.

After getting totally frustrated trying to make my pleats I realized that I needed to remedy the roll at the back. It was too loose and I didn't know how to tack it or shape it the way I needed. With Kevin's expertise and a little bit of tack strip, we smoothed the transition from the finger roll to the wood of the chair. This allowed for the hourglass shape you see above. Now I could get going on my pleats!

Like I said, with the modification to the back roll, and the tightening of the sides, the pleats almost formed themselves. Then something exciting happened... Kevin let me use the air-pressured staple gun!! While excited, I made sure to take all precautions and took it slow and when I wasn't 100% sure or comfortable I waited and asked for help. There are 90 lbs of pressure behind the trigger of that puppy and that it nothing to mess with. I like all my digits intact and without metal surging through them. Needless to say, I tucked my left hand behind my back as I used the gun, therefore no pics. *sigh* You'll have to trust me. I successfully stapled the sides!

I switched gears back to the buttons. I used pins to hash out exactly where I wanted them placed. I half measured, and half eyeballed. I knew I wanted the 3:2:3 and just had to space them to make them pleasing to the eye. In order to do so, I put it on the floor as it will be seen in a room.
Now that I had the spacing all figured out I busted out the biggest needle I've ever seen in my life. So big in fact, I had to ask my neighboring fledgling upholsterer to move while I pulled it through, in fear of stabbing her.

Now do you understand how big I'm talking? Yes. CRAZY big needle. And the way you thread this is interesting for a seamstress like moi. You thread around 1 yd of waxed twine through the eye, then thread the button on to the twine, then thread the other end of the twine through the eye again.This will leave your button looped into the eye. When you stab the needle through {can you say anger management?} from the front to the back, the button stays on the front and the twine is pulled to the back.

I only got about half way through before I had to start cleaning up for the day. But the last three will only take me a few minutes before I move on to the rest of the laundry list to finish dressing up Satine.
I may not have checked everything off my list for the day but she is definitely taking shape. I walked out the door of class, grinning from ear to ear with a sense of accomplishment, considering my newly acquired skills: staple gun and button making/applying. Now I have good news and I have bad news. The bad news is, there is no class this coming Saturday, so you won't be seeing another post for a couple weeks. I know... BOOO! But the good news is, I will be having a fun baby-shower-filled weekend in NYC instead, and will have a glorious update on that for you next Monday to fill in the gap.
I've got lots of fun and some disappointing projects for you coming this week, so stick around to see how they come out! Happy Monday Nesters!
PS: Did you guys all sign up for this weeks Monet necklace giveaway? Don't hesitate! That necklace is so amazing! <3


Wow! Looks amazing!
ReplyDeleteWowsa! Looking great! She's looking better and better! Yay!
ReplyDeleteHow fun!
ReplyDeleteI had never even thought about buttons popping off, but that would be a sad day indeed :(
Have a great week!
Oh gosh, it is looking soooo close to done. Super sad that you have to wait two weeks to finish her. You must just be itching with anticipation!
ReplyDeleteWow, would you look at how close you are to being finished? It's looking more amazing every weekend. The button-making things is awesome. Sure beats the old hammer routine we used to do when we made covered buttons and belt buckles back in the 50s and 60s.
ReplyDeleteI am soooooo jealous that you have an upholstery class in your area. Doesn't look easy, but think what you'll be able to do with your new skill set! It's looking gorgeous, and I love, love, love the color you picked.
ReplyDeleteReally cool blog!
ReplyDeleteFollow me? I'll be very happy if you do it!
Thank you so much!
www.cipollainspiration.blogspot.com
Thanks for the inside look at upholstering. I tried recovering a similar chair once, let's just say that I ran out of curse words before the project was complete.
ReplyDelete